Hardie Installers Expert Guide
Hardie installers are crucial for any exterior project. This guide dives deep into everything from choosing the right Hardie board products to proper installation techniques, safety precautions, and even cost estimations. We’ll cover everything you need to know, from the basics to advanced troubleshooting, ensuring your project is a success.
We’ll explore various Hardie board types, essential tools, and common installation procedures. Plus, you’ll learn about best practices for measuring, cutting, and fastening, along with crucial ventilation and moisture control steps. We’ll also tackle potential problems and how to fix them, providing a comprehensive approach to successful Hardie board installations.
Hardie Board Installation Basics
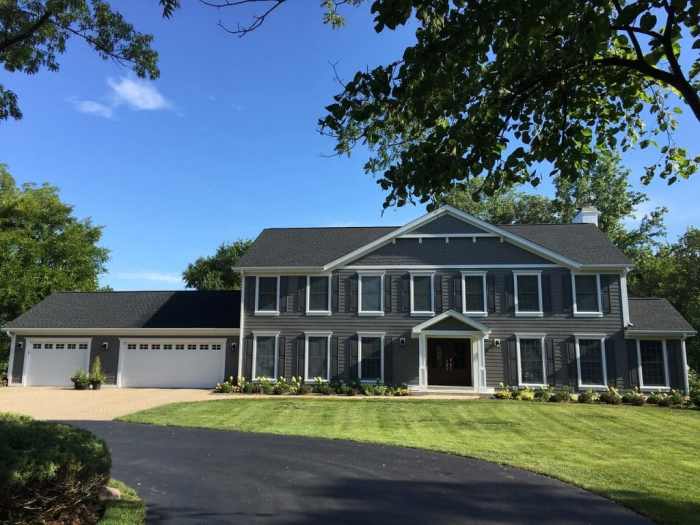
Hardie board, a popular siding material, offers durability and aesthetic appeal. Proper installation is crucial for its longevity and the overall appearance of your project. This guide covers the essentials, from product types to installation techniques.
Understanding the various Hardie board products available will help you choose the right material for your needs. Different types are designed for specific applications, ensuring optimal performance and visual appeal. Tools and techniques are also key components in achieving a professional-looking installation.
Hardie Board Product Types
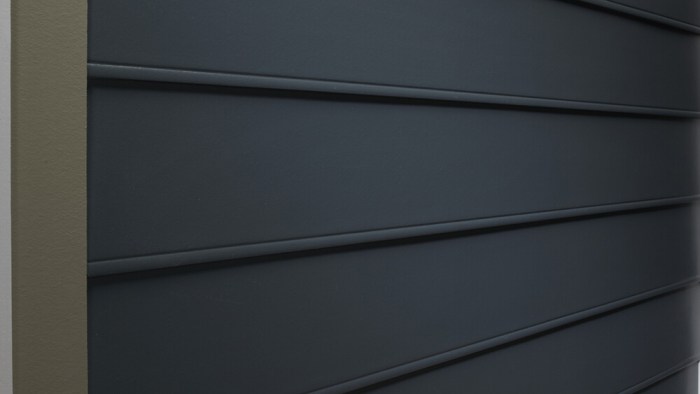
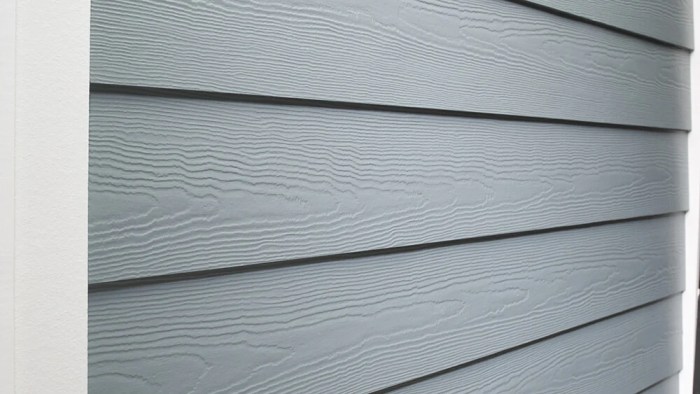
Hardie board comes in several forms, each with its characteristics. The most common types include HardiePlank, HardiePanel, and HardieShingle. HardiePlank is often used for siding, while HardiePanel is frequently seen in exterior cladding. HardieShingle provides a more traditional shingle-like appearance. Each type has variations in thickness and profile, influencing its suitability for different architectural styles.
Essential Tools and Equipment
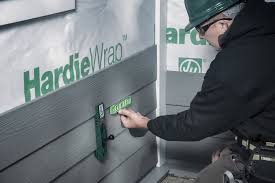
A comprehensive toolkit is vital for successful Hardie board installation. Essential tools include a measuring tape, level, utility knife, pry bar, hammer, drill, and various fasteners (screws and nails). Safety equipment, such as work gloves, eye protection, and hearing protection, is equally important. Investing in high-quality tools will ensure precision and efficiency throughout the installation process.
Installation Techniques and Procedures
Proper installation methods are paramount for a long-lasting and aesthetically pleasing result. Ensure the substrate is adequately prepared. This involves ensuring the surface is clean, level, and free of debris. Use appropriate fasteners and spacing for the specific type of Hardie board. For example, HardiePlank typically requires specific spacing and fastening techniques to avoid gaps or misalignment.
Substrate Preparation for Hardie Board
Proper preparation of the substrate is crucial for a strong and durable installation. Clean the surface thoroughly to remove any loose debris or contaminants. Ensure the surface is level and smooth. If necessary, repair any imperfections, such as cracks or holes. A level substrate ensures the Hardie board adheres properly and avoids future issues. This preparation step directly affects the longevity of the installation.
Hardie Board Product Specifications
| Product Type | Thickness (in) | Typical Size (ft²) | Common Colors |
|---|---|---|---|
| HardiePlank | 5/16 – 3/4 | 4’x8′, 8’x8′ | Beige, Gray, Brown |
| HardiePanel | 1/2 – 1 | 4’x8′, 8’x8′ | White, Tan, Charcoal |
| HardieShingle | 1/4 – 1/2 | 4’x8′ sheets | Wood tones, varied colors |
Installation Best Practices
Getting Hardie board installed correctly is key to a long-lasting, beautiful exterior. Proper techniques, from precise measurements to mindful moisture control, are crucial for a job well done. These practices will ensure your Hardie board installation stands up to the test of time.
Careful planning and execution are paramount to achieving a professional-looking and durable Hardie board installation. This involves understanding the nuances of measurement, cutting, ventilation, fastener selection, and troubleshooting potential issues.
Measuring and Cutting Hardie Board Panels
Accurate measurements are essential for a seamless installation. Use a tape measure and mark the cut lines clearly on the Hardie board. For straight cuts, a utility knife and a sharp, fine-toothed saw are ideal. Using a scoring tool before sawing will help prevent cracking. Precise cuts ensure proper fit and a clean aesthetic. Employing a speed square will help in making sure your cuts are square and even.
Ventilation and Moisture Control
Adequate ventilation and moisture control are critical for preventing mold, mildew, and rot. Ensure proper air circulation around the Hardie board. This is particularly important in areas with high humidity or frequent rainfall. Check your local building codes for specific ventilation requirements. Avoid installing Hardie board in areas with standing water or excessive moisture. Employing vapor barriers is also critical.
Fastener and Adhesive Installation
Proper fastener selection and application are vital for the long-term stability of the Hardie board. Use fasteners appropriate for the substrate (e.g., wood, concrete). Always follow the manufacturer’s recommendations for spacing and depth. A drill press and appropriate drill bits will ensure consistent drilling depth and reduce the risk of cracking. Consider using a specialized adhesive for certain applications. This can offer extra strength and stability. Using a caulking gun for filling gaps can improve the overall aesthetics and weather-proofing.
Fastening Methods Comparison
| Fastening Method | Advantages | Disadvantages |
|---|---|---|
| Screws | Strong, reliable fastening for most applications. It can | N is more labor-intensive, with potential for damage to the board if not installed correctly. |
| Nails | Relatively inexpensive and quick. | Less reliable than screws in high-stress applications, potential for splitting. |
| Adhesives | Strong, waterproof fastening, ideal for certain substrates. | A more complex installation process requires careful planning and application. |
Properly selecting the fastening method is crucial for a robust and durable installation. Consider the substrate, expected load, and weather conditions when making your choice.
Common Mistakes and Solutions
Improper installation can lead to problems. One common mistake is using the wrong fasteners. Using the wrong fastener size or type can compromise the structural integrity. Another frequent error is inadequate preparation of the substrate. A smooth, level surface is crucial for proper adhesion and stability. If you encounter problems, consult your local building codes or a professional for guidance. Don’t hesitate to ask for help when needed.
Troubleshooting and Maintenance: Hardie Installers
Keeping your Hardie board installation looking its best and lasting for years requires a little proactive care. Proper troubleshooting and maintenance are key to avoiding costly repairs and ensuring the longevity of your exterior cladding. This section details common issues and how to address them, along with preventative measures for moisture damage.
Common Installation Problems
Identifying and resolving problems quickly can save you time and money. Common installation issues include improper flashing, inadequate drainage, and poor sealant application. These issues can lead to water damage, warping, and premature deterioration of the Hardie board.
- Improper Flashing: Improperly installed flashing allows water to penetrate the cladding system, leading to moisture damage behind the Hardie board. This is often found at intersections of walls, roofs, and windows.
- Inadequate Drainage: Poorly designed or installed drainage systems can cause water to pool against the Hardie board. This can lead to moisture buildup and subsequent damage. Properly sloped surfaces and effective gutter systems are crucial.
- Poor Sealant Application: Gaps or improperly sealed joints allow water to seep into the wall assembly. This can result in significant damage if not addressed promptly. Ensure sealant is applied correctly and adequately covers all joints and penetrations.
Troubleshooting Steps, Hardie installers
When faced with potential problems, methodical troubleshooting is key. Here are the steps to follow to address common issues:
- Inspect the affected area: Carefully examine the area for signs of water damage, such as discoloration, warping, or bubbling. Note the location and extent of the damage.
- Identify the source of the problem: Determine if the issue is related to flashing, drainage, or sealant application. Checking for leaks and verifying proper slope are crucial steps.
- Consult relevant codes and specifications: Refer to local building codes and manufacturer specifications for correct installation procedures. This ensures compliance and a reliable solution.
- Address the root cause: Repair or replace damaged flashing, improve drainage systems, or reapply sealant as needed. Seek professional help if the problem is complex or beyond your capabilities.
Preventing Water Damage
Proactive measures are vital for avoiding water damage. Following these steps can help ensure your Hardie board remains in excellent condition for years to come.
- Properly designed drainage systems: Ensure that gutters, downspouts, and roof drains are correctly installed and functioning efficiently. Divert water away from the building.
- High-quality sealant: Use a quality sealant that is appropriate for the climate and environment. Regular inspections of sealant are vital.
- Thorough flashing: Install flashing correctly at all intersections and penetrations to prevent water from entering the wall assembly.
Maintenance and Inspection
Regular inspection and maintenance are essential for the longevity of your Hardie board installation. Addressing issues early can prevent extensive damage and costly repairs.
| Maintenance Task | Frequency | Description |
|---|---|---|
| Visual Inspection | Quarterly | Inspect for signs of water damage, cracks, or loose fasteners. |
| Cleanliness | Annually | Remove debris, dirt, and mildew. Use mild cleaning agents as needed. |
| Flashing Check | Biannually | Inspect flashing for damage, cracks, and leaks. |
| Sealant Inspection | Annually | Check sealant for cracks, gaps, and deterioration. Re-seal as needed. |
Project Case Studies
Real-world Hardie board installation projects offer valuable lessons. Analyzing successful installations, along with the challenges overcome, helps installers refine techniques and ensure high-quality results. These case studies also highlight the importance of meticulous planning and the use of appropriate materials for the specific project needs.
Case studies provide practical insights into the nuances of Hardie board installations. They showcase how different approaches work in diverse settings, from residential renovations to commercial construction. Understanding the unique challenges of each project and how installers addressed them empowers professionals to handle similar situations effectively.
Successful Hardie Board Installation Projects
Various factors influence the success of a Hardie board installation project. These include proper material selection, precise measurements, careful installation procedures, and adherence to building codes. Examining successful projects reveals how these elements intertwine to create a high-quality, durable finish.
- Project 1: Residential Siding Renovation – This project involved replacing aging vinyl siding on a three-bedroom home with Hardie board siding. The existing framing was in good condition, which simplified the installation process. The installers meticulously measured and cut the Hardie board panels to fit the precise dimensions of the house, ensuring a seamless transition. A key aspect was the use of specialized adhesive and fasteners tailored for the Hardie board material, and the meticulous sealing of seams to prevent moisture ingress.
- Project 2: Commercial Building Facade – This project entailed installing Hardie board cladding on a multi-story office building. The installers encountered challenges in coordinating with the existing building structure and incorporating specific architectural details. They employed scaffolding and specialized lifting equipment to handle the heavy panels and ensure precision in placement. Careful planning and communication between the installation team and architects were essential to address potential issues early on.
- Project 3: Garage Addition – This project involved installing Hardie board on a new garage addition. The installation team encountered challenges with uneven ground and a slightly curved wall. They used shims and carefully adjusted the panels to achieve a level surface, ensuring the long-term integrity of the siding. They also used a water-resistant sealant around the base and corners to prevent moisture penetration and extend the lifespan of the siding.
Comparison of Installation Approaches
Different projects demand different approaches. Analyzing the installation methods used in each project offers valuable insights. Consideration of factors such as the building’s structure, the size and shape of the panels, and the specific aesthetic requirements will impact the approach taken.
- Project 1 (Residential Siding) utilized a traditional, hands-on approach for fitting and securing the panels. The team relied on manual tools for measurement and installation.
- Project 2 (Commercial Facade) required a more complex, coordinated approach. The installation team incorporated specialized equipment, and the project relied heavily on pre-planning and detailed communication.
- Project 3 (Garage Addition) presented unique challenges related to the uneven surface and the project’s scope. The installation team had to adapt the approach to address the unique structural requirements.
Material Selection and Project Specifications
Choosing the right materials is crucial for the longevity and performance of the Hardie board installation. Different projects might require different panel thicknesses, colors, and finishes to meet the specific aesthetic and functional needs.
| Project | Panel Type | Panel Thickness (in) | Color | Finishing |
|---|---|---|---|---|
| Project 1 | Standard Hardie Plank | 5/8 | Warm Gray | Smooth |
| Project 2 | Hardie Board Cladding | 1/2 | Charcoal Gray | Smooth |
| Project 3 | Hardie Board | 7/16 | Beige | Smooth |
“Selecting the appropriate Hardie board material for each project is critical for success. The choice should align with the project’s aesthetic goals and environmental conditions.”
Safety Precautions During Installation
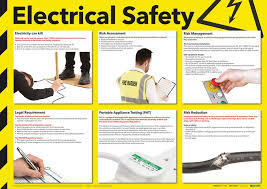
Installing Hardie board, while generally straightforward, requires meticulous attention to safety. Proper precautions are crucial for protecting yourself and your crew from injuries and ensuring a smooth, successful project. Following these guidelines minimizes risks and maximizes the efficiency of the installation process.
Safe handling of tools, materials, and the work environment is essential for a successful and injury-free Hardie board installation. Implementing the right safety protocols will safeguard your workers and prevent accidents, ultimately leading to a more productive and reliable project outcome.
Essential Safety Measures
Proper safety measures are paramount to a successful and incident-free Hardie board installation. This includes anticipating potential hazards and implementing appropriate protective measures. Careful planning and execution are vital to avoid accidents and ensure the well-being of all involved.
- Site Preparation and Assessment: Thoroughly assess the installation site for any potential hazards, such as uneven surfaces, trip hazards, or overhead obstructions. Clearing the area of obstacles and ensuring proper lighting are crucial for a safe working environment.
- Material Handling: Hardie board sheets can be heavy. Use appropriate lifting equipment, such as hand trucks or dollies, to avoid straining your back. Always maintain a secure grip to prevent slips and falls during transport. Employ proper lifting techniques to prevent injury.
Tool and Equipment Safety
Safe handling of tools and equipment is critical to prevent accidents during Hardie board installation. This includes recognizing potential hazards associated with specific tools and implementing safety protocols to mitigate risks.
- Power Tool Maintenance: Regularly inspect power tools for damage or malfunction. Ensure all guards and safety mechanisms are in place and functioning correctly before use. Never operate tools with damaged cords or faulty components.
- Tool Storage: Store tools properly to prevent accidental injuries or damage to the tools themselves. Secure tools and equipment to prevent them from falling or causing injury to personnel. Always store tools in designated areas to maintain a clean and organized workspace.
Personal Protective Equipment (PPE)
Personal Protective Equipment (PPE) is essential for protecting yourself and your crew during Hardie board installation. This includes appropriate clothing, eyewear, and respiratory protection. Understanding the specific risks associated with each task and selecting the right PPE is vital.
- Eye Protection: Always wear safety glasses or goggles to protect your eyes from flying debris, dust, or other hazards during the installation process. This is a critical measure for minimizing the risk of eye injuries.
- Respiratory Protection: Dust generated during Hardie board installation can be harmful. Use respirators with appropriate filters to minimize the risk of inhaling harmful dust particles. This can be particularly important in areas with poor ventilation.
- Hearing Protection: Use earplugs or earmuffs when operating power tools or in noisy environments. This prevents hearing damage, a significant risk in construction settings.
Safety Protocols During Different Stages
This table articulates key safety protocols for different stages of the installation process.
| Installation Stage | Safety Protocols |
|---|---|
| Preparation | Site assessment, material handling, and tool preparation |
| Installation | Proper lifting techniques, use of safety glasses, and appropriate ventilation |
| Finishing | Cleaning up debris, securing tools, and checking for hazards |
Ventilation and Material Handling
Proper ventilation and safe handling of materials are essential for a safe and healthy work environment. This includes controlling dust and other airborne particles and managing materials safely.
- Dust Control: Use appropriate dust control measures, such as wet methods or dust-suppressing agents, to minimize dust generation during installation. This helps to maintain a safe and healthy work environment.
- Material Storage: Store materials in a safe and organized manner, ensuring they are not stacked or placed in a way that could lead to instability or accidents. Proper storage is crucial for both worker safety and material integrity.
Materials and Supplies
Source: prosuperiorconstruction.com
Getting the right materials is key to a successful Hardie board installation. Choosing quality components isn’t just about the initial cost; it’s about ensuring the longevity and performance of your work. Using inferior materials can lead to issues down the road, like cracking, peeling, or premature deterioration, ultimately costing you more in the long run. This section will cover the essential materials, highlighting their importance and offering insights into different brands and types.
Common Hardie Board Installation Materials
A variety of materials is essential for a professional Hardie board installation. From fasteners to adhesives, each plays a crucial role in the project’s success. Understanding the different options and their applications is vital for a job well done.
- Hardie Board Panels: These are the foundation of your installation. Look for panels that meet the manufacturer’s specifications and are free of defects. Inspect for cracks, dents, or warping, as these can affect the final appearance and structural integrity.
- Adhesives: Appropriate adhesives are critical for securing the Hardie board to the substrate. Different types are suited for various substrates and weather conditions. Selecting the correct adhesive is crucial for long-term performance.
- Fasteners: Fasteners like screws or nails are used to reinforce the adhesive bond. They need to be compatible with both the Hardie board and the substrate. Choosing the right type and size is essential to avoid issues like stripping or pulling out.
- Sealants: Sealants are vital for creating a watertight seal around the edges and joints of the Hardie board. Proper sealing prevents moisture from penetrating and causing damage.
- Installation Accessories: These include things like spacers, shims, and leveling tools, which are important for achieving a precise and level installation. Using proper accessories ensures a clean, professional finish.
Importance of Quality Materials
Using high-quality materials is paramount for long-term performance. A poorly constructed installation, due to inferior materials, will likely lead to costly repairs or replacements. Quality materials are designed to withstand various weather conditions, resist moisture damage, and maintain their structural integrity over time. Using budget-friendly options might save money initially, but the long-term cost of repairs and replacements will often outweigh the savings.
Comparing Adhesive and Fastener Options
Different brands and types of adhesives and fasteners offer varying levels of performance. Choosing the right ones is crucial for a lasting installation.
- Adhesives: Some common types include polymer-modified portland cements, construction adhesives, and specialized Hardie board adhesives. Each type has specific strengths and weaknesses in terms of adhesion, flexibility, and moisture resistance. Factors like the substrate and weather conditions significantly impact the best adhesive choice.
- Fasteners: Common fastener types include galvanized steel screws, coated screws, and specialized Hardie board screws. The selection should consider the substrate, the load requirements, and potential environmental factors. Properly sized and installed fasteners are essential for preventing problems.
Material Categorization Table
The table below categorizes the materials by their function for easier understanding.
| Category | Material | Function |
|---|---|---|
| Fasteners | Screws, Nails | Securing Hardie board to the substrate |
| Adhesives | Polymer-modified Portland cements, Construction adhesives, Hardie board adhesives | Providing additional bonding strength and waterproofing |
| Sealants | Silicone, Polyurethane | Creating watertight seals around joints and edges |
| Installation Accessories | Spacers, Shims, Leveling tools | Ensuring precision and level installation |
| Hardie Board Panels | Hardie board panels | Primary material for cladding |
Environmental Impact of Materials
The environmental impact of the materials used in Hardie board installations should be considered. Manufacturers are increasingly focusing on sustainable options, and some products are made from recycled materials or offer reduced VOC emissions. Choosing eco-friendly materials helps minimize the installation’s overall environmental footprint. Consider factors like the sourcing and production methods of the materials when making your selections.
Installation Cost and Budget
Knowing the costs involved in a Hardie board installation project is crucial for homeowners and contractors alike. A clear understanding of the factors affecting the price, along with methods for estimating costs and managing the budget, is essential for a successful and profitable project. This section will detail these key elements.
Understanding the factors influencing Hardie board installation costs is vital for accurate budgeting. Numerous variables affect the overall price, from the size and complexity of the project to the materials used and the geographic location.
Factors Influencing Installation Costs
Several factors contribute to the overall cost of Hardie board installation. These include the size and scope of the project, the type and quantity of Hardie board required, the complexity of the installation, labor rates, and the cost of materials. Furthermore, geographic location and any special conditions, like difficult terrain or unusual weather, can also affect pricing. Accessibility of the project site and the need for specialized equipment also play a role in the final cost.
Estimating Installation Costs
Estimating Hardie board installation costs requires careful consideration of project specifications. A detailed plan should include measurements of the area to be covered, the type and quantity of Hardie board needed, and the complexity of the installation. Accurate material calculations are crucial to avoid unexpected additional costs. Labor costs are also significant, so estimating the number of hours needed for the job and consulting with qualified contractors is vital. Including contingency funds for unexpected issues is a best practice to prevent cost overruns.
A thorough project plan, precise material calculations, and a realistic labor estimate are key components for accurate cost estimation.
Average Cost Breakdown
The average cost of Hardie board installation services can vary considerably. Several factors influence the price, including the size of the project, the type of Hardie board used, and the complexity of the installation. The following table provides a general overview of average costs for different installation services. Remember, these are averages, and actual costs may vary.
| Service Category | Average Cost Range (per square foot) |
|---|---|
| Simple exterior siding installation (standard Hardie board) | $5-$10 |
| Complex exterior siding installation (multiple materials, difficult access) | $10-$15 |
| Installation of Hardie board on a large commercial building | $7-$12 |
| Installation of Hardie board with specialized treatments (e.g., fireproofing) | $12-$18 |
Budget Management Strategies
Managing a Hardie board installation budget effectively involves several strategies. Creating a detailed budget that accounts for all anticipated expenses is paramount. This includes not just materials and labor but also permits, inspections, and potential unforeseen circumstances. Negotiating with contractors and comparing quotes from different installers can help you find the best value. Paying attention to project timelines can also prevent cost overruns. Sticking to the planned budget and monitoring expenses regularly are crucial for successful project management.
Role of Permits and Inspections
Permits and inspections are essential parts of any Hardie board installation project. Obtaining the necessary permits ensures compliance with local building codes and regulations. Inspections are vital for ensuring that the installation meets these standards and codes. These steps may increase project costs, but they are necessary for the project’s longevity and safety. It’s important to factor these costs into the overall budget.
Conclusion
From initial product selection to final maintenance, this guide has equipped you with the knowledge to confidently handle your Hardie board installation project. We’ve covered the essential steps, best practices, potential challenges, and safety measures to help you achieve a high-quality, long-lasting result. Remember to prioritize safety and use the provided cost estimations to stay on budget. With this complete guide, you’re well-prepared to become a pro Hardie installer!